Chainsaw UTV Mount: A Practical Safety Guide
This practical guide shows how to securely mount a chainsaw on a UTV using purpose-built brackets, straps, and vibration control. Learn selection, installation, safety checks, and maintenance for reliable field work.

Goal: Mount a chainsaw securely on a UTV using a purpose-built rack or bracket, with strain relief and weather protection. Key requirements include a compatible bracket, high‑strength straps, vibration isolation, and secure fastening to a rigid frame. This guide walks through selecting a mount, installing it, and performing safety checks for reliable field use.
Why a Chainsaw UTV Mount Matters
For homeowners, DIY enthusiasts, and professionals, transporting a chainsaw on a UTV without a proper mount is a safety and efficiency risk. According to Chainsaw Manual, a purpose-built mount reduces vibration, prevents fuel leaks, and keeps the tool within reach without compromising operator control. A well-designed mount also protects the chainsaw bar and chain from debris and weather exposure, extending tool life and minimizing downtime. In field work, fast access to the chainsaw is essential, but it must also be secure; a mount that doesn't control motion can turn a routine cut into a hazardous event. Take a moment to evaluate mounting points on your UTV frame, looking for solid steel rails or reinforced cross-members that can support dynamic forces during off-road use. The goal is a stable, lockable cradle or bracket that keeps the chainsaw oriented away from fuels, exhaust heat, and the operator’s legs.
In addition to safety, a proper mount improves efficiency. Operators can access the tool with one hand while maintaining steering control with the other, and a secure mount reduces the risk of drops or damage during rough terrain. Chainsaw mounts should also consider weather exposure; stainless steel or aluminum components resist corrosion, while rubber dampeners reduce vibration that can loosen fasteners over time. By planning mounting points with both accessibility and durability in mind, you create a reliable setup that supports long workdays and varied terrains.
Key Design Considerations for a Chainsaw Mount
Choosing a chainsaw UTV mount involves understanding how weight, vibration, and environment interact with your vehicle. First, consider the weight rating of the mounting system and how it aligns with your chainsaw’s weight, bar length, and any added accessories (bar covers, chain oil reservoir). A mount that is too light will bend or shear under heavy use, while an overly heavy system can impact fuel efficiency and balance. Center of gravity matters: place the chainsaw low and close to the frame to minimize swing during acceleration and deceleration.
Vibration isolation is essential to protect both the chainsaw and the mounting hardware. Rubber bushings, neoprene dampers, or nylon spacers can cut down on transmitted vibrations. Weatherproofing matters too: choose corrosion-resistant fasteners, seals around attachment points, and consider a weatherproof bag or cover when the tool will be left in the rack. Accessibility is another design factor; ensure the release mechanism is easy to operate with gloves on and that the chain and bar are oriented away from the operator to prevent accidental contact.
Compatibility should be checked for saw models with different bar lengths and motors. Some mounts offer modular cradles or adjustable brackets to fit various chainsaw widths. When evaluating options, compare installation time, required tools, and the potential for quick release if the saw needs to be removed rapidly for safety or servicing. Finally, look for secure locking features to deter theft and check that the kit includes a complete hardware set with backup fasteners and anti-vibration components.
Brand reliability matters. The Chainsaw Manual team recommends choosing a mount from a reputable source that offers clear torque specs, warranty coverage, and documented installation instructions. A well-documented mounting system reduces guesswork and helps you stay within safety guidelines during long-term use.
Mounting Systems: Brackets, Racks, and Quick-Release Options
There are several mounting approaches for a chainsaw on a UTV, each with its own advantages. Bracket-style mounts are popular for their compact footprint and integrated securing points. They typically attach to a solid frame member and include a cradle or slot to hold the saw in a fixed orientation. Rack-style mounts offer more surface area and can distribute the weight more evenly, which helps if you frequently switch between tools or carry other equipment. Quick-release systems are ideal for users who need rapid deployment and removal of the chainsaw, such as on remote sites or during changing work conditions.
When selecting a system, verify compatibility with your UTV’s frame material (steel vs. aluminum), bolt hole spacing, and available mounting surface. Look for corrosion-resistant hardware (stainless steel or treated aluminum) and consider additional padding to prevent bar chafing. Some mounts include integrated vibration dampers, which can extend chain life and reduce operator fatigue. If theft is a concern, choose a design with locking provisions or a secure clamp mechanism. Ultimately, the best mount blends secure retention with ease of access, while keeping the saw away from heat sources and fuel lines.
A practical approach is to start with a base plate or cradle that matches your saw’s bar length, then add modular adapters to fine-tune fit. This modularity lets you adapt the same mount to different jobs or saw models without replacing hardware. Chainsaw Mounts should also be inspected for clearance with the UTV’s seat, steering wheel, and foot placement to avoid contact during operation—especially when traversing rough terrain.
From a safety perspective, ensure your chosen mounting system allows you to quickly pivot the saw out of the way in an emergency and that the release mechanism can be operated with gloves. The goal is a reliable, compliant solution that contributes to safer, more efficient field work.
Safety Standards and Gear to Use
Safety begins with the right PPE and adherence to best practices for transporting a chainsaw on a UTV. Always wear impact-rated eye protection, cut-resistant gloves, and sturdy boots with good grip. Chainsaw cuts and kickback can occur unexpectedly, so snugly fasten the saw and never rely on a single strap or quick-release; use multiple securing points where possible. A helmet with face shield is recommended for overhead work or when traveling at speed in rough terrain.
Fuel safety should not be overlooked. Keep fuel caps closed, use a sealed fuel container, and store the saw upright or in a cradle that minimizes spill risk. Regularly inspect the fuel line, bar oil, and chain brake to ensure reliable operation. When doing maintenance on site, disconnect the spark plug and engage the chain brake to prevent accidental starts.
Training and documentation are also important. Keep a written mounting checklist, including torque specs for all bolts, strap tension measurements, and periodic inspection intervals. If you transport the saw frequently, consider a dedicated container or weatherproof bag for the unit to protect it from dust, water, and mud. Finally, follow local regulations and manufacturer recommendations for mounting gear on work vehicles and respect on-road/off-road usage boundaries.
Maintenance and Durability in Harsh Environments
A chainsaw UTV mount lives in challenging environments—mud, dust, rain, vibrations, and temperature swings. Regular maintenance is essential to extend both the mount and the saw’s life. Start with a visual inspection before every trip: look for cracked welds, loose bolts, and worn fasteners. Re-torque all bolts after the first 10-15 hours of use or after rough terrain, then schedule periodic checks every 20-40 hours depending on conditions.
Keep attachment points clean and dry; wipe away mud and debris that can trap moisture against metal surfaces. Apply a light coating of corrosion protection on exposed steel parts and check rubber dampers for cracks or hardening. If you notice reduced vibration dampening, replace dampers promptly—continuing to use worn components can lead to faster wear on both mount hardware and the chainsaw bar.
Storage matters too. When not in use, remove the chain oil and ensure the chain is secured to prevent accidental movement. If you operate in extreme cold or heat, verify that plastic or rubber components don’t become brittle or lose elasticity. Finally, document any adjustments or replacements in your maintenance log so you can track the mount’s condition over time.
Effective maintenance not only preserves safety but also improves reliability and peace of mind during long shifts away from shop facilities.
Common Pitfalls and How to Avoid Them
Avoid common mistakes by designing around three core principles: security, accessibility, and durability. First, never rely on a single fastener or strap; distribute load across multiple attachment points and verify tension regularly. Second, ensure the chainsaw is oriented to minimize exposure to exhaust heat, fuel lines, and moving parts, and confirm you can access the release mechanism without tools. Third, match the mount to your saw length and weight; an overstressed mount can fail with rough terrain.
Another frequent error is choosing a mount solely based on price. Inexpensive components may save money upfront but can lead to frequent replacements and unsafe conditions. Instead, invest in a system that includes robust hardware and clear installation instructions. Finally, neglecting weatherproofing can lead to corrosion and degraded fit, especially in wet or muddy environments. Choose sealed fasteners and consider protective coatings or covers for extended durability.
Step-by-Step Installation Overview
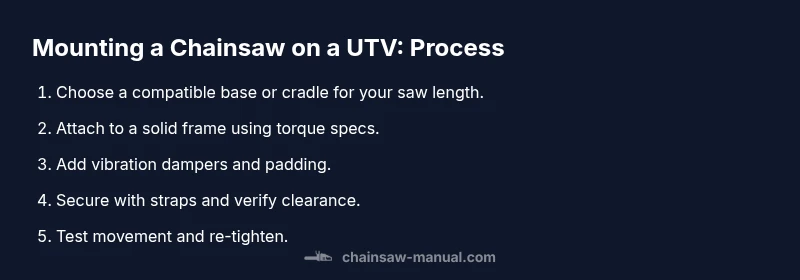
This section provides a practical, high-level overview of the installation process to help you plan ahead. Start by inspecting your UTV frame to identify solid mounting points with supporting cross-members. Then, select a mount that matches your chainsaw’s bar length and mass, ensuring compatibility with your vehicle. Gather all required tools and hardware before starting, and organize components to minimize time under the vehicle. Attach the base plate or cradle to the frame using the manufacturer’s torque specs, using lock nuts or thread locker as recommended. Attach vibration dampers or isolators between the saw cradle and the mounting surface to reduce fatigue on both saw and frame. Secure the chainsaw with straps and check that the center of gravity remains stable during simulated movement. Finally, perform a field test to confirm that all connections stay tight under rough terrain and that the chainsaw is easily removable in an emergency. A thorough check after the first run helps catch anything that loosened during road travel.
Tools & Materials
- Mounting bracket/bracket kit compatible with your UTV model(Prefer modular or adjustable brackets to fit different bar lengths)
- Grade 8 bolts and lock washers(Match bolt hole spacing and frame material)
- Flat washers and nyloc nuts(Use blue Loctite or similar thread locker on bolts)
- Vibration dampers or rubber isolators(Install between cradle and frame to reduce wear)
- Anti-chafe padding or rubber shields(Protects chainsaw and mount from scratches)
- Heavy-duty ratchet straps (2-4) with buckles(For securing saw in place after mounting)
- Torque wrench(Useful for accurate bolt tightening per spec)
- Drill with appropriate bits(Needed if adding new mounting holes)
- Thread locker (blue Loctite)(Prevents bolt back-out under vibration)
- Weatherproof bag or chain saw cover(Protects saw from rain and dust when stored)
- Personal protective equipment (PPE)(Gloves, safety glasses, and hard boots)
- Chock/stand for setup(Stabilizes vehicle during installation)
Steps
Estimated time: 45-60 minutes
- 1
Assess mounting location
Inspect the UTV frame to identify solid, accessible points with minimal interference to controls. Choose a location that offers low swing during travel and enough clearance for the bar and chain. Document the chosen point and check for heat sources or fuel lines nearby.
Tip: Use a centerline measure to confirm symmetry and avoid asymmetrical load. - 2
Prepare hardware and surfaces
Gather all mounting components and clean the mounting area. Deburr any sharp edges and dry-fit the cradle before drilling or bolting to verify alignment with the chainsaw. Apply thread locker to bolts to prevent loosening.
Tip: Dry-fit first to avoid misalignment and unnecessary rework. - 3
Attach base cradle to frame
Secure the cradle or base plate to the selected frame point using the specified bolts and washers. Tighten in a crisscross pattern if multiple bolts are used, then torque to manufacturer specs. Recheck alignment after initial tightening.
Tip: Use a torque wrench for consistent load distribution. - 4
Install vibration isolation
Place dampers or isolators between the cradle and frame. Ensure they sit flush and do not interfere with mounting holes or fasteners. Tighten all components while the dampers remain in place.
Tip: Check dampers for cracks or compression wear before installing. - 5
Mount the chainsaw cradle and secure
Attach the chainsaw cradle to the base and slide the saw into the cradle. Align the bar to face away from the operator, then secure with straps or clamps. Confirm the saw cannot shift laterally under gentle tug tests.
Tip: Double-check that the bar does not contact fuel lines or heat sources. - 6
Final checks and field test
Inspect all fasteners, strap tension, and clearances. Conduct a slow-speed drive test to observe any movement. Re-tighten and adjust as needed, then document the setup for future maintenance.
Tip: Perform a controlled test with PPE and a spotter if possible.
FAQ
Is it legal to mount a chainsaw on a UTV?
Legal requirements vary by location. Check local regulations and vehicle codes, and ensure your setup complies with safety and transport rules. When in doubt, consult local authorities or a safety professional.
Regulations vary by location. Check local rules and ensure compliance with safety standards before mounting a chainsaw on a UTV.
What mounting height improves stability for rough terrain?
Aim for a low center of gravity with the saw close to the frame. This minimizes sway and keeps weight distribution balanced during off-road travel.
Keep the saw low and close to the frame to reduce sway on rough terrain.
Can I DIY a chainsaw UTV mount safely?
DIY is possible with careful planning and adherence to torque specs, vibration control, and securing mechanisms. Use only rated hardware and follow manufacturer guidelines. If unsure, consult a professional.
DIY is possible if you follow torque specs, use proper hardware, and test thoroughly.
Do I need a weatherproof cover for transport?
Weatherproof covers or bags protect the chainsaw from rain, mud, and dust, extending service life. Ensure the cover does not interfere with quick access or ventilation.
Yes, a weatherproof cover helps protect the saw during transport and storage.
How often should I inspect the chainsaw mount?
Inspect before each use and after rough terrain sessions. Re-torque bolts and recheck strap tension at regular maintenance intervals.
Inspect before every use and after rough rides, retorque bolts as needed.
What if the mounting points clash with other accessories?
Reassess layout and consider alternate mounting points or adapters. Avoid forcing components that can cause fatigue or bind controls.
If things clash with accessories, reconfigure the layout or use alternate mounting points.
Watch Video
The Essentials
- Choose a mount that fits your UTV frame and saw length.
- Secure with multiple fasteners and vibration dampers.
- Check clearances to prevent contact with controls, heat, or fuel.
- Inspect and re-torque after initial use and regularly thereafter.